Setting Up Single Sign-On (SSO) with Microsoft
Single Sign-On (SSO) lets your employees log in to Darlean using their corporate Microsoft account — no separate password required. Access is managed centrally through Microsoft Entra ID.
Available on the Pro plan and above.
Before You Begin
Setup involves two parallel tracks — make sure both participants are ready:
| Who | What's needed |
|---|---|
| Darlean Administrator | Workspace admin role + access to domain DNS settings |
| IT Administrator | Access to Microsoft Entra ID with permissions to create applications |
Overview
Steps 1–4  →  Darlean Administrator verifies the domain
Step 5     →  IT Administrator adds Darlean to Entra
Step 6     →  Both exchange settings and certificates
Steps 7–9  →  Darlean Administrator tests and activates SSO
Step 1 — Open SSO Settings
Performed by: Darlean Administrator
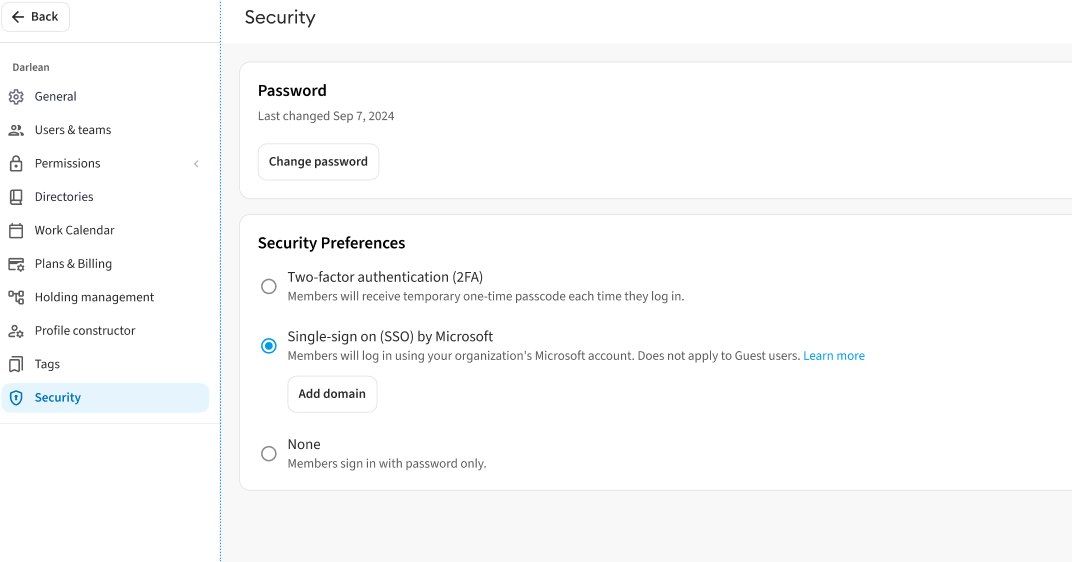
- Go to Settings → Security
- Under Security Settings, select Single Sign-On (SSO) via Microsoft
- Click Add Domain
Step 2 — Add Your Corporate Domain
Performed by: Darlean Administrator
- Enter your corporate domain, for example
yourcompany.com - Click Continue
- Darlean will display a TXT record for verification — copy it:
- Click Verify — you'll proceed to the next step
Step 3 — Add the TXT Record to DNS
Performed by: Darlean Administrator
- Log in to your DNS provider's control panel (GoDaddy, Cloudflare, Route 53, etc.)
- Find the DNS records section for your domain
- Create a new TXT record and paste the copied value
- Important: when adding a TXT record for SSO verification, you must specify the prefix _dms-sso as the name (Host/Name) of the DNS record.
- Save your changes
Not sure how to add a TXT record? In Darlean, click How to verify your company domain — it includes step-by-step instructions for popular DNS providers.
How long does it take? Changes usually apply within 5–30 minutes, but can take up to 48 hours.
Step 4 — Verify the Domain
Performed by: Darlean Administrator
- Return to Settings → Security
- Click Check Status next to your domain
Domain verified — you'll see a Verified status and a Configure Connection button. Proceed to Step 6.
TXT record not found — wait a few minutes and click Check Status again. If the error persists, make sure you copied the record without any spaces and that changes were saved in DNS.
Step 5 — Add Darlean to Microsoft Entra ID
Performed by: IT Administrator
This step can be done in parallel with Steps 1–4.
- Sign in at portal.azure.com
- Go to Microsoft Entra ID → Enterprise Applications
- Click New Application → Create your own application
- Enter the name
Darlean - Select Integrate any other application → click Create
- Open the created application → Single sign-on → SAML
The application is ready. Proceed to Step 6.
Step 6 — Configure the Connection
Performed together by: Darlean Administrator and IT Administrator
In Darlean, click Configure Connection — a window will open with all the required values.
6a. From Darlean → to Entra
In Entra, open Basic SAML Configuration and fill in the fields:
| Field in Entra | What to enter |
|---|---|
| Entity ID | Copy Entity ID from the Darlean window |
| Reply URL | Copy Reply URL from the Darlean window |
Under Attributes & Claims, verify:
| Attribute | Value |
|---|---|
| Email address | User Email field from the Darlean window |
| Username | Username field from the Darlean window |
6b. From Entra → to Darlean
In Entra, go to Single sign-on → SAML and copy the App Federation Metadata URL. Paste it into the Federation Metadata URL field in the Darlean window.
6c. Exchange Certificates
Certificates allow Darlean and Microsoft to verify each other's signatures.
Certificate from Entra → to Darlean:
- In Entra, download the Certificate (Base64) from the SAML Signing Certificate section
- Upload it to the Upload certificate from Entra field in the Darlean window
Certificate from Darlean → to Entra:
- In the Darlean window, click Download Darlean Certificate
- Upload it to Entra under Verification Certificates
Once all fields are filled in — click Save and Test Connection.
Step 7 — Add Users in Entra
Performed by: IT Administrator
Only users assigned to the Darlean application in Entra will be able to log in via SSO.
- In Entra, open the Darlean application → Users and Groups
- Click Add user/group
- Add the relevant employees or groups
If a user is not added here — they will get an error when attempting SSO login, even if their account exists in Darlean.
Step 8 — Test the Login
Performed by: Darlean Administrator
After saving the settings, a Sign in with SSO button will appear on the Darlean login page. Try signing in with your corporate account.
Login successful — you're in Darlean. An Activate SSO button will appear in workspace settings. Other users continue to log in with their passwords as usual.
Login failed — you'll be returned to the password login screen. Other users are not affected. Check the error table below and try again.
Troubleshooting
| Error | Cause | What to do |
|---|---|---|
| Failed to connect to identity provider | Incorrect metadata URL | Check the Federation Metadata URL in Darlean settings |
| Certificate verification error | Certificates don't match | Re-upload certificates on both sides (Step 6c) |
| Account not found | User not added in Entra | Add the user to the Darlean app in Entra (Step 7) |
| Certificate expired | Certificate is outdated | Reissue the certificate and update in settings |
Step 9 — Activate SSO for Everyone
Performed by: Darlean Administrator
Once the test is successful and you're ready to enable SSO:
- In settings, click Activate SSO
- Confirm the action
After this, all users with your domain will log in via SSO only — password login is disabled for them.
Important: if your admin account uses a different domain (e.g., SSO is set up for
@company.kzbut you log in as@admin.io) — you can always log in with a password and disable SSO if needed.
How Employees Log In
- Open Darlean
- Click Sign in with SSO
- Enter your corporate email
- The Microsoft login page will open
- Enter your corporate password (and complete two-factor authentication if enabled)
- Done — you're in Darlean